This code could be worth a bit of coin! How much would depend on what plan you chose.
Here is the code/link to use:
A Technology Geek's Site
This code could be worth a bit of coin! How much would depend on what plan you chose.
Here is the code/link to use:
This was been a long time coming as we moved to a Pepwave Max Transit for internet access in 2020, prior to that we were constantly trying to get decent connectivity when we camped and it often was a frustrating experience.
Over the first three years of travel, we tried all sorts of gadgets to acquire internet access. Most were a waste of money. The only really consistent internet connection we found was the original AT&T Connected car plan that came with a Mobley device. That device itself was very rudimentary and needed to be plugged into an ODB2 port under the dash on a car. First thing I did was to buy an adapter from Amazon. It’s an ODB2 adapter and soldered on a 12v cigarette lighter adapter to power it while in the motorhome as there isn’t an ODB2 port. Truck chassis have something very different.
That worked well for the first year, and I knew I needed a better device to plug that SIM into to get more speed than what the Mobley could provide. Also, at the end of 2018, Mopar had a deal with AT&T for a new Mobley and their $22 unlimited data plan again. I jumped on that to have 2 SIM’s available to me in case one had an issue.
In October 2018, I found a Netgear Nighthawk MR1100 (First Net compatible) hotspot at Best Buy for $180. I purchased it immediately and put my Mobley SIM into it. The download speeds went from about 5Mbps to 40 Mbps and much higher if closer to a tower. But even that 4×4 MIMO cellular hotspot/router wouldn’t always give me usable bandwidth. I tried all the usual external antennas and such, even putting the device on the roof once. Mostly those efforts were a waste of time.
One thing I did discover while camping in the Grand Tetons, I could edit that device’s firmware (Netgear MR1100) and add certain cellular bands to the pick list, which by default only had Auto as a choice. I read that the FirstNet band (B14) quite often worked when the rest of the AT&T bands were unreliable. I added that choice to the pick list (which is not possible anymore after AT&T made a firmware change to the Netgear) But thankfully my edits stayed and I can still pick B14 when I need to. B14 just seems to work when you are out in the boondocks.
Although I found that leaving it pinned to B14 when traveling wasn’t a good option, so now I change it back to Auto when B14 isn’t needed to get reliable signal. And now, since installing the Max Transit, I rarely use the MR1100 anymore. But have decided to keep it and probably put my second Mobley SIM back into it now that I purchased a T-Mobile 30GB SIM that’s costing $10 a month in December 2023.
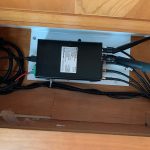 Here is a bit more detail on the Max, during the winter of 2020-2021 I purchased and installed the Pepwave Max Transit with a single modem and CAT-18 modem.
 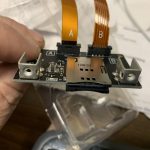 (CAT-18 modems are the minimum to buy as it has 4x Carrier Aggregation) The carrier aggregation makes all the difference. When you are far from the closest cell tower, it will combine up to 4 signals into one for you,
 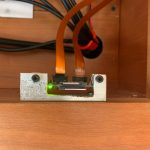 making even -110-120db signal into something very usable. One of the best things I installed for that Max Transit was a SIM extender. Pepwave puts the SIMs in a VERY difficult spot to get to once its mounted and the antenna cables are connected. This device allowed me to put the SIMs in an easily accessed location, right in front. Yes the mount I made is horible to look at but effective. No one makes a mount that I could find so i cobbled this together from a piece of aluminum angle I had around the garage.
Today, I would probably get a 5G model, although they are a bit pricey but a CAT-20 modem is now the standard. There are some new chip-sets example the X65 specifically coming to cellular router market right now, so I would hold out till they are in the new Pepwave’s.
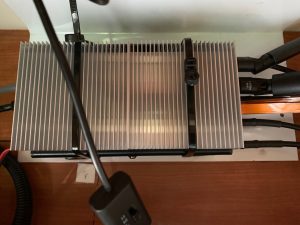 Something of note: I found the max transit almost too hot to touch after a bit so I added a couple of aluminum heat sinks and a fan to keep it a bit cooler, especially when that side of the coach is toward the sun. (which it is more often than not) Aluminum 80mm Heat Sink 3.15×3.15x1inch
I installed a PUMA-401 4×4 Cellular MIMO antenna on my rooftop bat-wing 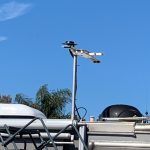 antenna. The bat-wing allows the PUMA to stay flat when retracted (driving) or deployed (camping). When deployed, the PUMA antenna is about 40″ above the roof of the motorhome (and other motorhomes around me) helping get line of sight (LOS) to the cell towers. The 401 has a GPS antenna in it, but it does not have a WiFi antenna in it. In hindsight, that could have been a good option for getting better campground WiFi. (if their WiFi is usable, in my experience, most are not) I almost never connect to campground WiFi anymore, but having more options is always better in my opinion.
 Since adding the Max Transit, we have never been without internet, no matter how far out in the middle of nowhere we have been. This includes the Great Mississippi River Road Trip (GMRR in 2021. Most of that trip is listed in a dictionary as “the middle of nowhere.” The only way we could use the phone a lot of the time was to turn on WiFi calling so the calls would go out the Max Transit’s cellular data connection.
Prior to leaving on that trip, I purchased a few 100GB data SIMs from the other carriers. T-Mobile postpaid @ $50 a month, AT&T prepaid @ $55, and a Verizon 100GB SIM for $90 a month. (I bought that extra AT&T SIM as I have always wondered how long AT&T will keep our connected car plans around (Mobley)
In 2022 after talking to a lot of fellow campers at the Xscapers July 4th Convergence in Colorado regarding their Starlink observations (there were over 20 of them with SL antennas mounted) I decided to replace those three other 100GB SIMs with a Starlink RV system. First thing I did was to let the AT&T prepaid lapse. Once we got home that fall, I canceled the TM and Vz SIMs. Just those last two will pay for more than the SL monthly charges. The SL RV plan allows you to pause your service (just like my Google Fi phone or DISH outdoors account). That pause capability will save quite a bit of money as those SIMs couldn’t be paused, meaning we had to keep paying monthly when we weren’t traveling.
Those three extra SIM’s were costing $195 a month. ($2340 yearly) Currently Starlink RV is around $150 a month, using it for our 6 months of travel will cost $900, a $1440 savings each year. Then my quandary was whether to go with the $2500 in motion SL dish or the $600 dish. I went with the In motion and after getting back from Alaska this fall I was glad I did. It worked unbelievably well. Probably due to its much larger dish and wider angle of the sky to see more satellites at the same time. And, not having to deploy & stow it for each move was priceless in my opinion. There is already a lot to do when moving. So reinstalling the pole mount and fishing the incredibly fragile cabling thru the openings in the
I understood the SL limitations with obstructions, so keeping the AT&T Mobley plan active in the motorhome will keep us connected 98% of the time. I will put both Mobley SIMs into it and just have it randomly switch between them. In our extensive travels I have found that AT&T normally has connectivity everywhere, Verizon maybe 75% of the time; (Vz had almost no connectivity in Alaska on our 2019 trip) and T-Mobile only seems to give us service when near towns, even using its long-range low Mhz B71. The PUMA supports that low frequency band, most do NOT. It’s hit or miss with the T-Mobile service, but when it has connectivity, it is often the fastest speeds.
 For getting WiFi from the campground, I tried a lot of devices over the last 5 years, most were slow and if they were used as a WiFi as WAN device very little
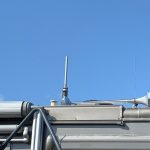
 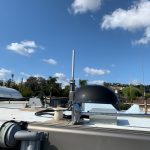 connectivity, except for the Mikrotik Metal. Here is a link to the groove. I found it was not meant to be lying on its side like I do when traveling. Mikrotik Groove looks a lot like the Metal model I used. I mounted it on a Diamond K9000 that I modified to fit on my roof to allow raising and lowering it from inside.
Summer 2022 I moved to a Mesh network internally to distrubute fast WiFi signal in the Bus for our laptops and phones with 2 nodes of eero 6+ Mesh . It works extremely well, especially since both are connected to gigabit switches hard wired inside the Bus. One is in the front inside the cabinet over the passenger seat, and the other is above the W/D in the rear. That winter I pulled a couple Ethernet cables from the front to the rear switch witch the rear eero is plugged into. Today the eero mesh is setup as a bridge to that same Ethernet switch in the rear of the coach that has all the Solar equipment connected.
These are the switches I purchased for the Bus, I wanted ones that run natively on 12v Netgear Gigabit Switch 12v
When we arrived home I turned off my Starlink service so we didn’t need to pay the $150 a month while the bus was in storage. We should be heading out again in April so prior to that I will be switching it back on.
I had never hear of this device prior to a few days ago. A couple we met told me they had something called “The Spot”. It sends predetermined text to a satellite to let folks know where you are and if you need help when your are in places without cell signal. (many hundreds of miles on are trip thru Canada to Alaska, and many miles of highway in Alaska too.
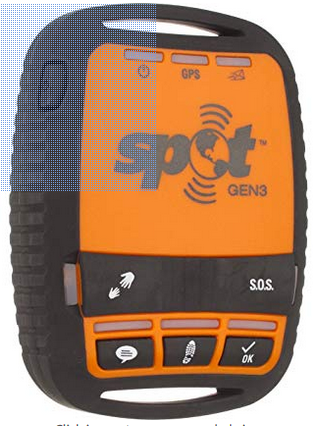 It has a few buttons that allow you to send messages to your family (or anyone) One button is setup to say they are OK and includes their current GPS coordinates. One is to get emergency help to your current location and the third can be setup to say you need other type, non emergency help. Like towing or roadside assistance etc. It currently costs around $131 on Amazon and $99 a year for the satellite service. After talking to this couple I ran into another person that got it recently as their brother in law (who is an Alaskan Bush Pilot) recommended it to them. He was going to loan them one of his, but they bought one instead and said they just push the notification button when at a place without cell service. Which is fairly often out here in Alaska and most places in Canada too. Here is a link to the device on Amazon which is the cheapest place I could find it during a web search. https://amzn.to/2YGeG9K
I am in Alaska right now, but am going to see if I can get one of these shipped to us before we head back into Canada on the way home. We will be taking the Cassier Highway and based on the coverage maps from ATT, Verizon and T-mobile we will have no signal for almost all the way back till we get near the larger city’s in the south. (there were at least 100 miles of the Alcan that had no service either.
JFYI I just pulled the trigger and Amazon is shipping it to an RV park we will be staying at the night of August 7th, its “Guaranteed” to be delivered on the 7th. HAHA.
I will review it once I’ve traveled with it and used it a few times for checkins.
After staying at a few different campgrounds right after purchasing our coach last winter in Tucson and having to redo my tablet, phone and laptop WiFi settings at each campground I started thinking about finding a better way to do it. I knew an internal access point was part of the solution but was thinking I probably needed something else to bring in signal from further away. I came across this solution, although not perfect the cost was incredibly low. Around $100 for everything. I picked up a Ubiquiti NanoStation M2 – Wireless Access Point – AirMax (NSM2US) for the external antenna/router and a Ubiquiti airGateway-LR airMAX WISP 2.4 GHz Wireless Access Point for inside the coach. I bought a couple of these cables, Cable Matters Cat6a Snagless Shielded (SSTP/SFTP) Ethernet Patch Cable in Black , one to power the Nanostation (NS) from the airGateway as it supplies POE and the other to facilitate setting the system up the first time.
The NS can pick up WiFi signals from a very long distance if you have Line of Sight to the transmitter. Its simple to pick up free WiFi from McDonald’s or Starbucks from a distance if you can see the building. I also use it in campgrounds no matter what the signal strength they have. It has a slider to change the output signal strength. Most issues I saw with connectivity prior to the NS was that my device could see them transmitting, but they couldn’t get my reply due to a low signal strength of the tablet, Phone or Laptop. The NS does away from that issue as it has a powerful transmitter. You need to set that transmitter strength depending on what you are connecting to. Sometimes I point it to one of my hotspots and you are so close I have to set the strength to 0 so I don’t overpower the hotspot.
I have been using this setup for over a year now. About 7 months of camping and it works flawlessly. I highly recommend. The only regret I have is neither of them are AC protocol compatible and are only one band, 2.4 Ghz. Hopefully they will make an AC Nanostation with 5 & 2.4 Ghz in one antenna..
I had set all this up the hard way as I had never worked with Ubiquity. A week later I found Davids post… https://www.youtube.com/watch?v=-i8SmOf5ZTw I compared what he did to what I had kludged together, I like his config options better so I reconfigured it similar to what he posted in his video. I haven’t looked back. -Bill